For the last few weeks there has been a small project that I have been working on to house a collection that is quite special. When there is a spare half hour, I can pop down into the basement and give the shelf a quick coat of Milk Paint. It needed at least two with this type of Milk paint.
I am not a fan of steps and would honestly just paint it two coats and be done. However, my husband has taught me that steps are completely necessary when doing a project such as this. Sanding, cleaning, wiping, painting, waiting and waiting some more. Waiting is the hardest part of projects. Why can they not be done when I think of starting? Is anyone else like that? But, when you do take the time to complete the steps and see the finished work, the look is so rewarding. And knowing the paint will not flake off because you took the time to actually sand and prep your surfaces helps!

Disclosure.
Published December 29, 2021
Updated March 30, 2022
This page might contain affiliate links. In the event of a sale, I will be awarded a small commission (at no extra cost for you).
What is this Shelf going to hold
Ever since I was a teenager, I have collected shot glasses. Friends and family have gifted me glasses from all over the world. This collection is so special and has been kept in a box in our basement since our house move in 2019. I am so excited to get it out and displayed. I found a cabinet that will be below this cabinet when it is done. This little project feels like we have leveled up, like the next stage of adulting in our mid 30s now feels complete.

Sanding the Shelf before Milk Paint
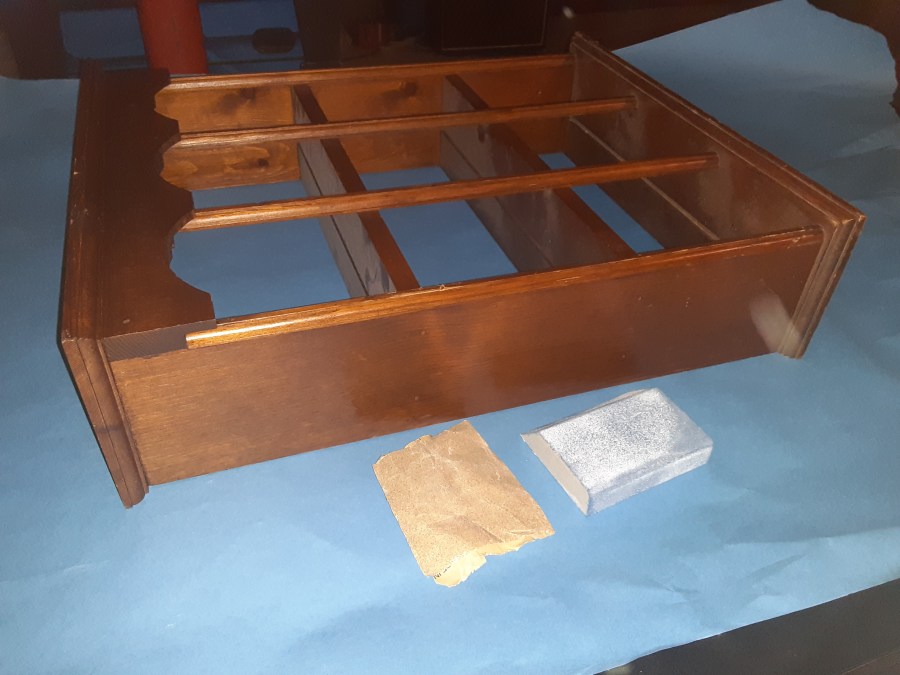
This summer, at a rummage sale, I found this shelf for a super price of $5! This shelf is made of real wood and was stained dark brown. However, with time, this shelf has a whole lot of scratches and damage. Before painting, this wood needed to be sanded to get rid of the glossy stain. Sanding also helps the paint adhere to the surface much better and prevents flaking. I used a 150-grit sandpaper and a sanding block to hold the paper. Using a sanding block helps to create a more even sanding, it also helps to grip the sandpaper.


Protect yourself while sanding
This was a tricky piece to sand, as it had a lot of edges and creases and corners. Using the sanding block was so helpful to get into all of the sharp edges. Plus, it was dusty. SO dusty. It is highly recommended to wear a mask while sanding an old dusty piece of furnature. Aditionally, place the shelf on a dropcloth. Being severely allergic to dust mites, I had to wear a mask while sanding. If I do not, I can count on suffering from a sinus infection for at least a month.

Clean the Shelf before Milk Paint
Once the entire surface is sanded, denatured alcohol was used to clean any dust off the surface. This steps also helps to prep your wood, so the paint soaks in even more. In the past I have used isopropyl alcohol, which is ridiculously expensive, and not quite the right product. Denatured alcohol is best right before you paint. Just make sure you wear gloves and do this in a properly vented area. Since the pandemic, and certain products have been hard to come by, isopropyl alcohol has been extremely high priced. We bought a bottle for under two dollars in 2019, and now the same bottle is close to ten dollars in 2021. How insane is that?!

These shop towels are the best to clean projects as they do not leave residue when wiped across surfaces. We use them for so many projects from painting to epoxy staining. Thick paper towels that are specific to work projects also help to clean up when you drip Denatured alcohol. Win-win.
Don’t be like Monica. Wear gloves.

Which Milk Paint to use
Earlier this year I blogged about a cabinet in our kitchen that I used this same Milk Paint. It had maroon and winter green paint in spots, and I painted it Navy Blue. There was quite a bit of the Paint left in the container. It is a Rust-Oleum Milk Paint, when dried, the finish is very matte. I prefer it to be semi-gloss or satin, so used General Finishes Satin Topcoat. Check out the Kitchen Cabinet Milk Paint Reface blog, where I give a step-by-step process on how to take a big cabinet and turn it into extra kitchen storage!
Paintbrush Choices
Using a 2-inch brush, paint the first coat of Milk Paint onto the sanded and cleaned surfaces. Make sure to catch any drips. This paint requires only 30-60 minutes between coats for dry time. However, I let it sit for a few days before the second one went on. This brand of topcoat is great for milk paint projects. It goes on so smooth and settles perfectly. As my favorite brush was damp, I used a different one that did not work as well as expected. Goes to show, having a favorite brush is best!

Matte or Satin
There are a few differences between Rust-Oleum Milk Paint and General Finishes Milk Paint. This Rust-Oleum brand is matte finish while General Finishes is more of a satin off the bat. When I first purchased this brand of Milk Paint, I had never used it before. I had also never worked with any type of chalk paint; have not since either. But, looking at the finishes between chalk paint and matte paint, they look very similar.
Being matte finish, you see every scratch and finger tough. Literally. With four kids, not having even a layer of satin topcoat is a lesson that I learned. Just go with a topcoat to protect your hard work and make your project last longer. Plus, when you use a topcoat, it is easier to clean. Trust me. If you have kids or guests or family who like to live in your space, they will want to put their fingers all over your freshly painted beautiful project and then there will be fingerprints. Avoid the agony of spaghetti fingers on your matte finish and secure your sanity with Satin topcoat.
Not that I have any personal experience with this specific scenario.

A 2-inch angled brush helps to get the Milk Paint evenly into all of the corners and nooks and crannies of this Shelf!

Dry-Time
When one side is completely painted, you can already start to see how quick Rust-Oleum Milk Paint dries. It leaves a very matte finish and the glossy paint in its beautiful navy blue slowly goes away. Originally, I had thought about doing the outsides and edges the Navy Milk Paint and leaving the inside still wood tone. It looked really cool and modern, but not my style.

The shelves had this deep cut in each of them, which is assumed to be to rest plates or other flat objects, so they stand on display. I had to make sure that all of the sawdust was out before painting, and to get paint into all the crevices and creases. No brown will remain!

Topcoat on this Milk Paint Shelf
After a week of drying, the second coat was painted on this Shelf with my trusty 2-inch angled paintbrush. After a day of drying, the topcoat could get painted on. My brush was still a little damp, so I did not want to use it to paint the satin topcoat on. Instead, I used a foam brush. It was not the best. The foam brush caused drips and streaking and a general feeling of angst while using it.
Looking back, I should have just used the damp brush and thrown the foam brush into the trash. But I digress. In addition to the horrible foam brush, the fancy blue paper was also thrown out as it was covered in dust from sanding the wood. As I did not want my shelf to be accidentally covered in dust while drying, I cut open a paper bag and used that to set the shelf on while painting.

If you decide to use a topcoat after Milk Paint, make sure you use a good amount of light so you can see properly. Making sure you cover all surfaces and paint uniformly over your project to avoid inconsistencies in the finished look.

Not quite finished
This General Finishes Satin Topcoat will take anywhere from 24-72 hours to fully dry and cure. Unlike Milk Paint that can be dry to the touch in 1-hour, topcoats need much more time to dry fully. Once it is fully dried, Tyler is going to router out the back to insert a piece of mirror, so the back is a mirror instead of seeing the wall. I cannot wait till it is done! I found a Mid Century Modern cabinet at a local Thrift Store for $15 and transformed it into a dry bar for our dining room. This Milk Paint Shelf is going to be hung on the wall above to display all of my shot glasses. I have more than forty from all over the world, from Wisconsin to Bahamas to Alaska and California to Russia and Florida. Click the link below for the finished shelf!
~Monica


Copyright: All content and photos on Monica's Scratch Kitchen are copyright protected. Please do not use them without written permission. Thank you.
Leave a Reply