Right now, in Wisconsin it is colder than your freezer. Literally. This morning at school drop-off, the van temp stopped at -3. I think it broke. In reality, it was -10 without the wind chill. With a wind speed of 10mph, the “feels like” temp at 7:35 am was -23 degrees Fahrenheit. Why do I live where the air hurts my face? I decided to start a project that has been on my list for a long time. It was time to start the Kitchen Cabinet Milk Paint Reface.
In our kitchen we have the most annoying pass through. I hate it. On Sunday, when it was -25 without the wind chill, I rearranged our living room and moved a huge cabinet out and into that horrible opening. I do not understand kitchen islands. Really! Who wants people (I mean littles) running in circles through your kitchen as you are trying to make them food? Not me! I loathe turning around and bumping into them, causing a fuss and ouchies and crying. I never fall, sometimes.

Disclosure
Published February 9, 2021
Updated March 3, 2022
This page might contain affiliate links. In the event of a sale, I will be awarded a small commission (at no extra cost for you).
Solution to a morning problem
Our kitchen does not have a lot of storage, and this beauty just doubled the storage space! We have a plan for WAY in the future to redo the kitchen and close off that opening, but until then I will have patience and see if I actually like it shut off.
In the morning, Tyler gets up for work before the sun. In construction, you work hard, and he starts really early. Every morning, he clinks ice cubes into a travel coffee mug and the noise echoes through that opening, down the hallway, and wakes our kids up. Even with their bedroom doors closed those kids stir before the crack of dawn.
This would not be an issue, but I am not a morning person. Waking up before the sunrise is not my idea of fun. If this small change can help the kids sleep longer, then I am more than happy to give it a go.
Now, don’t get me wrong, I am not about to board up the wall. Or ask my hard-working man to not use ice so his coffee doesn’t scold his mouth. He gets up at 4:50am; you tell him not to drink coffee.
So, into the kitchen this brute of a cabinet went. Soon she was filled with all sorts of goodies, clearing out precious shelf space and decluttering the countertops. I love it already! Last night, I did not trip on toddlers, bump into children, or repeatedly ask 4 children to get out so I could cook their precious faces dinner. It was heaven.
After the kids were in bed, hanging out in the newly closed off space, Tyler and I had a fun dream about paint and colors for the cabinets instead of the golden orange oak. With 39 other projects already started, limited funds, and not enough time, a kitchen remodel is LAST on our list. The space may be outdated, but it is functional and livable in for a few more years.

Tyler did let me paint the cabinet! I love having extra paint laying around and a husband that gives me a green light. Seriously the best combo right there, folks. I love painting. Really, I do! Walls, ceilings, furniture… anything I can paint myself on the cheap to change a room or a design space, I love it!
Plus, this small project can help us to have a vision of the space and colors. Initially, we would love to have the lower cabinets a navy blue, and the uppers be white. This Kitchen Cabinet Milk Paint Reface will help us solve this future problem now.
Prep, prep and more prep
As a certifiably impatient person, I have a hard time with prep work. Needing to sand, sand between coats, and allowing something to dry is honestly the worst. BUT the best in that it needs to be done or your hard work looks like crap. Trust me, I’ve been there. If Tyler has taught me one thing about DIY, he taught me the proper way to prep before painting. Now I might not always do prep his way… I will always do it, so the final product looks good. Most of the time.

Sanding the Kitchen Cabinet Before Painting
After laying plastic and taping it so splatters do not end up on the existing cabinets, I went to work with sandpaper. Giving it a rough sanding will help the paint stick. It is messy work, but so essential!
Plus, it helped to get rid of some of the awful red and green. No, I did not paint the cabinet the red and green, Tyler got it from his grandma already painted these colors. It is such a solid cabinet, and we have used it for our tv for years with the doors open and never needed to look at the colors.

If I could design my dream kitchen, the upper cabinets would be white and the lower cabinets would be a navy blue. All of the hardware would be gold or copper and the countertop and backsplash would be Carrera marble. So to see if I like the navy blue, I am painting some of the cabinet blue and leaving the rest natural as it already matches the kitchen.
Milk Paint for the Kitchen Cabinet
This is a can I had left over from redoing our bedroom end tables earlier this year. Rust-Oleum Milk paint Navy with a matte finish. This stuff goes on amazing! I do two coats with sanding between to kick down any high spots. For a shine, finish with a layer of polyurethane.

After the cabinet was sanded, I wiped it down to remove the dust residue. You won’t want dust in the paint finish.

Milk Paint starting on the Kitchen Cabinet
Now onto the fun part! A 2-inch angled brush is by far the most versatile brush in my opinion. It works on walls, cutting in, furniture, ceilings, and cabinets. It is my go-to paint brush. If you invest in a good quality brush, take care of it and wash it after each use it will last a long time. That is another thing that Tyler taught me about DIY; take care of your tools.

See ya green!!!

For the doors, I do the hardest parts first. Doing the inside pieces of the panels first, then horizontal bars, and then vertical pieces and finally the edges. It helps to make a plan on how you will paint it to look uniform and keeping with the grain of the wood for a natural look.

Round 2 of Paint on the Kitchen Cabinet
One coat down, not too shabby! But it will need a second as I could still see some of the green and red underneath the navy. Wait for the paint to dry fully before sanding. The manufacture recommends a solid 1-hour dry time before the second coat. I use the same sandpaper for this next sanding time and just giving every spot a good rub down helps to get rid of high spots and paint brush strokes. It might look odd but trust me it will not look this pale after the second coat gets brushed on.
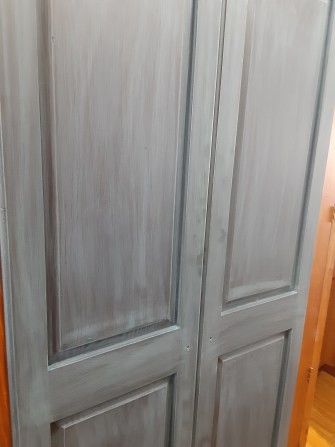
After a good wipe down, the second coat can get painted on. It will look more solid and uniformed in color.

Milk Paint Dry Time
When every surface has been painted, let it dry! This brand of milk paint takes the better part of an hour to dry. I like to wait at least two hours between coats. Within 24 hours it should be good to go! I will see tomorrow if it will need a coat of polyurethane as a topcoat.
Topcoat is recommended when you use a Milk Paint, as the Milk Paint tends to be more of a Matte finish. Plus, with a high-traffic space such as the kitchen, doing two-to-three layers of topcoat will help the product durability.

Not too shabby for a day of hard work when it is too cold to go out! I am simply amazed at the difference the color change makes for this cabinet.

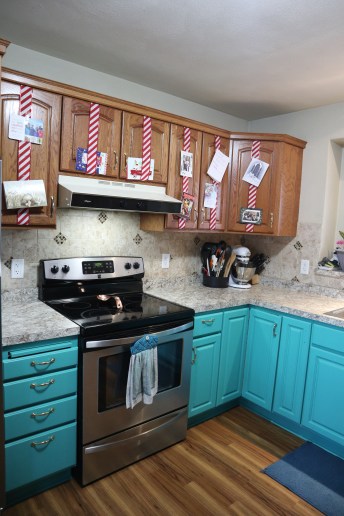
As I update this post, it is March 3, 2022. I had never done any topcoat layers on this Kitchen Cabinet Milk Paint Reface. There are very many scratches in the Rust Oleum Milk Paint, but the paint itself did stand up to a years’ worth of wear and tear in our kitchen. Since the New Year, our kitchen cabinets have also been painted. The upper cabinets are now white, and the lower cabinets are Patina Green. All of the hardware is copper, and I love the new fresh look to this kitchen! Check out the image below, as this was right in the midst of the kitchen reface, and the link below for the blog written about that fun process.
~Monica
Copyright: All content and photos on Monica's Scratch Kitchen are copyright protected. Please do not use them without written permission. Thank you.
Leave a Reply